
Lower Back Pain Relief for Nurses: Stretches and Habits That Help

You finish a shift, sit in the car, and your lower back reminds you of every lift, turn and long stretch at the computer. If you want lower back pain relief for nurses that fits into a real work week, this guide is built for you.
By the end, you will have a short stretch routine for after your shift. You will also have a few habits for transfers and charting, and a simple way to track what helps.
Why does this work? Small, gentle moves done often tend to help more than one big effort on your day off. And when you know where and when your back hurts, you can fix the right things first.
Here is the honest part. This is general self-care, not medical advice, and it does not replace a doctor or physical therapist. The last step covers when to call one.
Plan on about 25 minutes to set up and learn the routine. It is beginner level, and you only need a bit of floor space.
- Phone notes app, or a small notebook and pen
- Phone timer
- Clear floor space, about 6 feet by 3 feet
- Yoga mat, or a folded bath towel or blanket
- Comfortable clothes you can move in
- Small pillow for your head (optional)
- Lumbar support cushion for your chair (optional)
- Foam roller (optional, used later)
- Map your lower back pain pattern
- Clear a small floor space for stretching
- Start with the knee-to-chest stretch
- Add the cat-cow movement
- Release tension with a supine twist
- Open your hips with a kneeling hip flexor stretch
- Set up your lifting stance before every patient transfer
- Reset your posture during charting and med passes
- Build a five-minute evening recovery routine
- Track your stretches and habits for two weeks
- Know when to call a doctor or physical therapist

Map Your Lower Back Pain Pattern

Your back gives clues, but only if you write them down. Open a notes app and answer these four questions from memory:
- Where does it hurt? (low center, one side, or near the hip)
- When does it start? (early shift, after transfers, end of shift)
- What were you doing right before?
- How bad is it, from 0 to 10?
Keep adding to it for your next 2 shifts. Most people skip this step and go straight to stretching, then wonder why nothing changes. The notes show you which habits to fix first, and our nurse shift organization tips can help if the pain follows a rushed shift.
Clear a Small Floor Space for Stretching

You need about 6 feet by 3 feet, enough to lie flat with your arms out. Move shoes, laundry baskets and pet bowls out of the way.
Lay down a yoga mat. No mat? Fold a bath towel in half lengthwise so your spine and hips are not on bare, hard floor.
Later in this guide I may link a few mats, foam rollers and lumbar supports. If you buy through those links, Ward Wisdom may earn a small commission at no extra cost to you. You do not need any of them to start.
Start With the Knee-to-Chest Stretch

Aim for a gentle pull, never a hard yank. Your lower back should feel like it is slowly letting go.
- Lie on your back with knees bent and feet flat on the mat.
- Clasp your hands behind one thigh. Use the shin if the knee feels cranky.
- Draw that knee slowly toward your chest.
- Hold for 20 to 30 seconds while you breathe out slowly.
- Lower the foot and switch sides.
Do 2 rounds on each leg. Keep your head resting down, because lifting it strains your neck.
Add the Cat-Cow Movement
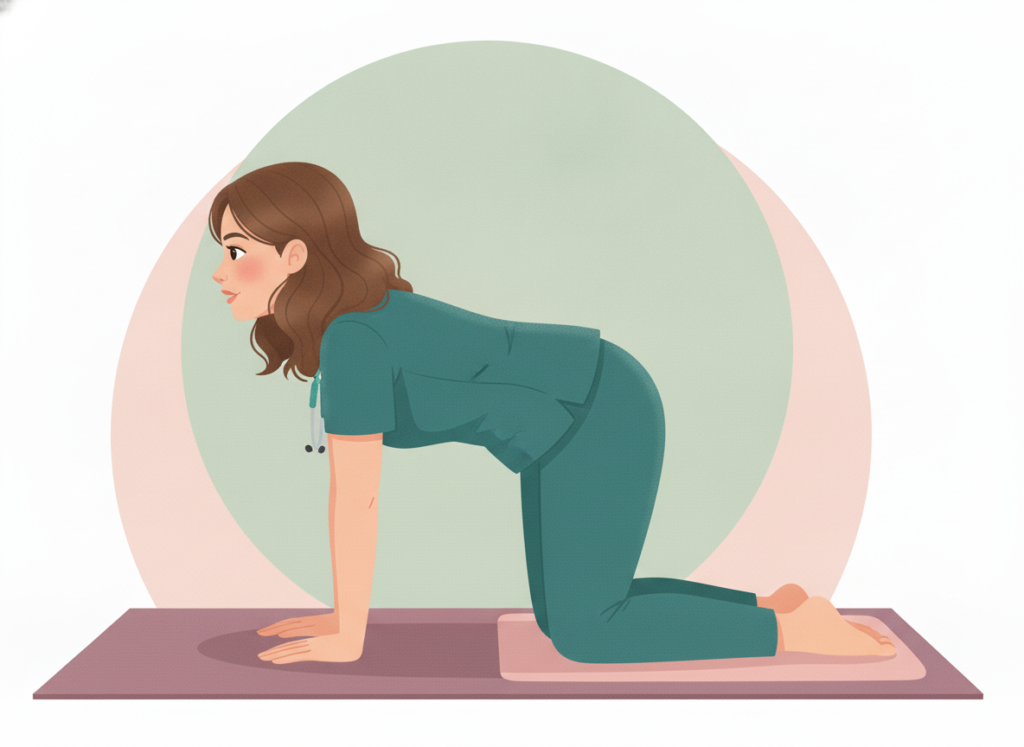
If your wrists complain on hands and knees, make loose fists or drop down onto your forearms. Set your hands under your shoulders and your knees under your hips, like a table.
Breathe in and let your belly sink toward the floor. Breathe out and round your back up toward the ceiling, chin tucked.
Take about 4 to 5 seconds for each direction, for 8 to 10 rounds. Quick, bouncy reps miss the point, because the slow spine movement is what loosens stiff muscles. Tuck a folded towel under sore knees.
Release Tension With a Supine Twist

Hours of bending forward leave your spine craving a gentle turn. This is one of my favorite stretches after a long shift because it asks for almost no effort.
- Lie on your back with knees bent and feet flat.
- Stretch your arms out to the sides like a T.
- Let both knees drop slowly to the right.
- Hold for 20 to 30 seconds, breathing slowly.
- Bring your knees back to center and repeat on the left.
Your knees do not need to touch the floor. If they hang in the air, slide a pillow under them so your back can relax. Keep both shoulders resting down.
Open Your Hips With a Kneeling Hip Flexor Stretch

Tight hips from sitting at the computer and standing at bedsides can pull on your lower back all day. Loosening the front of your hips takes some of that pull away.
Kneel on your right knee with your left foot flat in front, like a slow lunge. Tuck your tailbone under, as if you are pulling your belt buckle up toward your chin. Then shift your weight forward a few inches until you feel a stretch at the front of your right hip.
Hold for 20 to 30 seconds, then switch sides. Do 2 rounds per side. A common slip is arching the lower back to go deeper, which defeats the purpose, so keep that tailbone tucked.
Set Up Your Lifting Stance Before Every Patient Transfer

Your feet decide how well your back handles the load. Pause for two seconds and run through this quick check before you lift, boost or turn anyone:
- Place your feet about shoulder-width apart, with one foot slightly forward.
- Move the bed to a height near your waist.
- Bend at your knees and hips, not your waist.
- Keep the patient or object close to your body.
- Turn by moving your feet, never by twisting your spine.
Tighten your belly gently, like you are bracing for a small bump, before the move starts.
Reset Your Posture During Charting and Med Passes
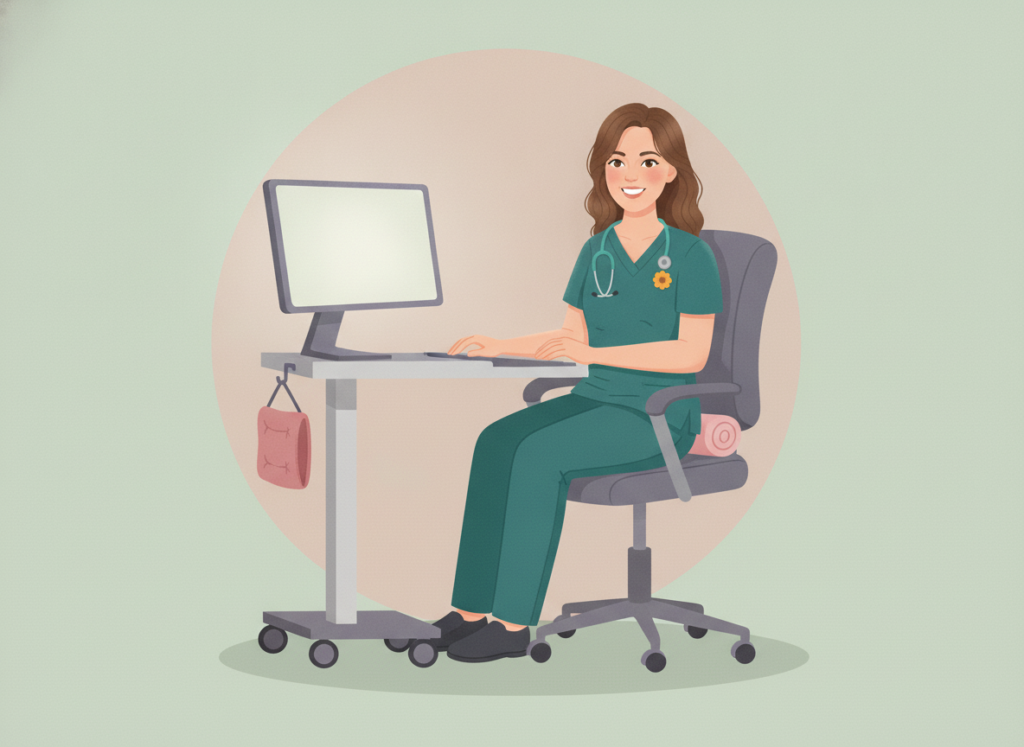
About every 30 minutes, check how you are sitting or standing. I see the same slump all the time: a low screen on a cart pulls your head forward and rounds your back.
At a chair, slide your hips to the back, put both feet flat, and tuck a small rolled towel or lumbar cushion in the curve of your lower back. At a cart, raise the screen toward eye level if you can.
Shift your weight from foot to foot while you stand. Carrying a heavy bag adds strain too, so a lighter pack from our nurse work bag essentials list may help.
Build a Five-Minute Evening Recovery Routine

Link the moves you have already learned into one short routine. You do not need a new workout, only the same stretches in a set order. Set a phone timer for 5 minutes and move through this list:
- Knee-to-chest, 30 seconds per leg (1 minute total)
- Cat-cow, slow and steady for 1 minute
- Supine twist, 30 seconds per side (1 minute total)
- Kneeling hip flexor stretch, 30 seconds per side (1 minute total)
- Lie flat with knees bent and breathe slowly for 1 minute
Your back is usually stiffest right after a long shift, so go gently on the first stretch. Skip any move that causes sharp pain, and do the rest.
Track Your Stretches and Habits for Two Weeks

14 days covers enough shifts to show a pattern. Open the note you started in step 1 and add one line at the end of each day.
Write the date, whether you stretched, your pain score from 0 to 10, and one habit you remembered at work. A printable stretch and habit tracker does the same job if you like paper better.
On day 14, read it all back and look for what lines up with your lower scores. Keep those habits and drop the rest. A missed day is just information, so do not restart the count.
Know When to Call a Doctor or Physical Therapist

Stretches and habits help with ordinary muscle strain, but they cannot sort out every cause of back pain. Get urgent medical help right away if you notice any of these:
- Numbness around your groin or inner thighs
- New trouble controlling your bladder or bowels
- Sudden weakness in a leg
- Back pain with a fever, or after a fall or accident
Book a visit with a doctor or physical therapist if pain lasts more than a few weeks, keeps getting worse, wakes you at night, or travels down a leg with tingling.
If you hurt your back at work, report it through your employer’s process. Bring your tracker to the appointment, because those notes save time and give them real details.
Fix Common Problems With Your Back Routine

Most beginners hit one of these bumps in the first week. Find your problem in the left column and try the fix on the right.
Change one thing at a time, so you can tell which fix worked and write it in your tracker.
Free printable · instant PDF
Lower Back Relief Pattern Map and 2-Week Stretch & Habit Tracker
- ✓ Lower Back Pain Pattern Map
- ✓ 2-Week Stretch and Habit Tracker
Opens a print-ready page — choose "Save as PDF" to keep it.
Frequently Asked Questions
Q. How long should I stretch after a shift to feel a difference?
Five minutes is a good place to start. Some people feel looser right away, while others need a few weeks of regular practice. Writing down your pain score each day shows you whether it is helping.
Q. Is it okay to stretch when my lower back is already sore?
Gentle stretching is often fine for ordinary muscle soreness. Stop if you feel sharp pain, tingling or numbness, and check with a doctor or physical therapist if you are unsure.
Q. Do I need a lumbar support or special shoes to get relief?
No. A small rolled towel behind your lower back works in a chair, and the stretches need no gear at all. Supportive shoes and cushions help some nurses, but comfort and fit are personal, so pick what feels right to you.
Q. Should I stretch before my shift as well as after?
A few slow rounds of cat-cow before work can help you feel warmed up. Keep it light and gentle, and save the longer holds for after your shift.
Q. What should I do if there is no lift equipment nearby for a transfer?
Wait and get help instead of lifting alone. Ask a coworker, find the slide sheets or lift your unit uses, and follow your facility's policy. Good form helps, but it does not make an unsafe lift safe.
- Back aches by the end of the shift, and you are not sure why
- Stretching is random or skipped
- Transfers and charting happen on autopilot
- No notes on what helps or hurts
- A 5-minute routine you can do after any shift
- A lifting check you run before each transfer
- A posture reset about every 30 minutes
- 14 days of notes that show what works for you
- Notes app or notebook
- Phone timer
- 6 ft by 3 ft of floor
- Mat or folded towel
- Optional: pillow, lumbar cushion, foam roller
- Write down where, when and how bad your pain is
- Clear 6 ft by 3 ft and lay down a mat
- Knee-to-chest: 20 to 30 seconds per leg
- Cat-cow: 8 to 10 slow rounds
- Supine twist: 20 to 30 seconds per side
- Hip flexor stretch: tuck your tailbone, hold 20 to 30 seconds
- Check your stance before every transfer
- Reset your posture every 30 minutes
- Do the 5-minute evening routine
- Track daily for 14 days
- Call a doctor or PT for red flags or lasting pain
You Have a Back Care Plan Now

You now have a short stretch routine, a lifting check and a tracker, which is a real start on lower back pain relief for nurses. That is more than most of us had after our first year on the floor.
Be patient with yourself, and keep the routine small enough that you will really do it.
For your next step, start the tracker tonight and try the five-minute routine after your next shift. If the pain lingers, book that appointment.
Save this pin for later, so it is ready on your next tired night.

Written by
Hannah Brooks
Founder & Nurse Resource Curator
I started this blog because nurses and nursing students deserve resources that are practical, honest and kind to their time. Too much advice online is vague, recycled or written by people who have never pulled an all-nighter before an exam or limped out of a 12-hour shift. Here you will find study plans, NCLEX prep strategies, brain sheet templates, new grad survival tips, shift meal ideas, gear reviews and real conversations about burnout, money and career change. Every guide is researched carefully, and I tell you when something is my…
